
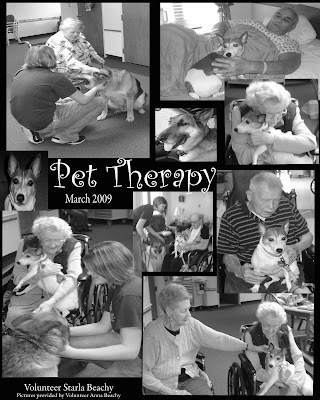
Saturday, March 14, 2009
Harley Jane Got a Job!
That is right! Harley was at work today for an hour and a half. Starla and my mom took Harley to Miller Merry Manor in Wakarusa to visit the residents. She did an excellent job and the residents loved her! She left with them begging for more :) She will be going back with Starla and my mom and maybe I will even tag along next time.
Saturday, October 25, 2008
Are my photography classes paying off?
Well my photography classes are almost over and I put them to the test in taking Starla's senior pictures. We still need to take her soccer pics but here is what I have now. Let me know what you think! Good or bad as long as it is constructive criticism :)
Thursday, October 9, 2008
Photography 101: Outdoor Landscape
This week we went to a beautiful park in Goshen across from Meijer. We learned how to take professional looking pictures and what makes a good landscape picture. It was a beautiful and relaxing evening.
Saturday, September 27, 2008
Photography 101: Understanding ISO AND the different Scene Modes
The past two weeks have been very busy which is why I have not been able to post the last two classes. The first class was on lighting, specifically ISO and White Balance. ISO allows me to adjust it according to how bright or dark it is around the subject. It does not relate to the flash at all. It is what enables people to take pictures in places like museums where flash is not permitted. The different settings of ISO changes how sensitive the camera is to the surrounding light. I took these pictures in my dark basement in the back corner where there is only one little window. The only thing that chages from picture to picture is the ISO settings are 200, 400,800,and 3200.


White Balance is a setting in your camera where you tell the camera which temperature of light your subject is in. The settings of light include incandescent(light bulb),fluorescent, or daylight are the most common.If you set the camera on the wrong setting then your whole picture will tint a certain color. For example if you set your camera on incandescent and take a picture in natural daylight it will be tinted blue. And then when your camera setting is matching the same as what is on your subject the color is really natural.


The last lesson was learning about the different scene modes and what the camera is doing in each setting. I learned how to take better pictures especially in the action mode. To do this I had to adjust the shutter speed so that the camera wouuld take the picture faster but as a result the images are not as clear as they usually are.(there are other things but I don't want to confuse more than I already have) For practice I took lots of pictures at my little brother-in-laws soccer game today.
Tuesday, September 23, 2008
A Great Weekend!
Thursday, September 11, 2008
Photography 101:Understand Apature and Shutter Speed
Today was Lesson #3 and it was mostly focused on photo editing using the program Adobe Photoshop. The main objective of the lesson is to understand the terms Apature and Shutter Speed and then take pictures that show our understanding. To help you further understand this I will tell you which kind of camera I have exactly.
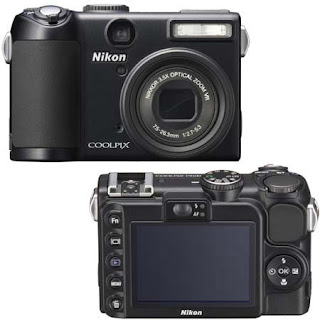
It is a Nikon Coolpix P5100. It is digital and has a fixed lens. Because of the fixed lens it is harder for my camera to show the drastic difference between Macro Mode and Landscape mode when you are a certain distance from your subject. The ideal cameras for showcasing these features are the SLR (single lens reflex) cameras. Unfortunately there is approximatly a $500 difference in price at least. Thankfully to Adobe Photoshop I can edit the pictures to get the same great effect. Here are some pictures illustrating these camera settings.
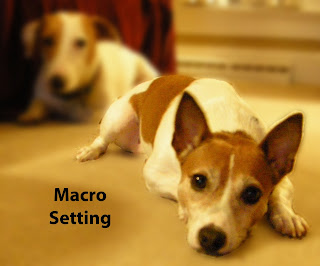
This setting is indicated on most cameras as the flower. The camera automatically zooms to the position at the closest distance at which the camera can focus. My camera can focus as close as 4 cm.

This setting is indicated on most cameras as a mountain. The camera focuses at infinity. Sometimes the objects in the foreground are not always in focus. Meaning, sometimes the dog in the front would be out of focus while the dog in the back would be in focus. It is a pretty neat setting! Because I was so close to both dogs the camera picked up both of them clearly.

I used Adobe Photoshop to edit this picture because I did not like the background, i.e. the register, and so I blurred out everything except the dogs which made them really stand out.
Harley is the dog in front and Ervin's dog Lucky is the one behind her. They are so well behaved!
Tuesday, September 9, 2008
Photography 101: Exploring Your Subject
This week we met at Martin's Hardware Store in Nappanee. It was a challenging lesson. We learned how a camera works; what the functions are of the different parts of the camera. We learned about the depth of field and which settings you want the camera set to depending on what depth of field you are going for. The terms that we learned were f/stop, aperture, and shutter speed. It was frustrating and challenging trying to figure out what the instructor was wanting us to do until after she had critiqued my pictures and didn't have anything good to say about them. So being the anal person that I am I stayed after and took more pictures to gain her approval and to make sure I knew what I was supposed to be doing. So here are some of the pictures that I took. Enjoy!


 For my homework assignment I decided to have my bike be my subject and here are a few pictures of it. I know there are a lot but it really is "a few" compared to the approximately 90 pictures that I took. It was really hard to narrow it down to 50 and I still have a lot of work narrowing it down to the 3 best that I have to turn in on Thursday!


For my homework assignment I decided to have my bike be my subject and here are a few pictures of it. I know there are a lot but it really is "a few" compared to the approximately 90 pictures that I took. It was really hard to narrow it down to 50 and I still have a lot of work narrowing it down to the 3 best that I have to turn in on Thursday!

Subscribe to:
Comments (Atom)
